Home › Forums › Slot Car Talk › Tech Tips / Q & A / Tutorials › Motor Break In Tool
Tagged: MMBIR Motor Break In Rig
- This topic has 4 replies, 2 voices, and was last updated 4 years, 7 months ago by
 BarkingSpyder.
-
AuthorPosts
-
June 10, 2021 at 11:50 AM #16620
Introducing the Muehlegger Motor Break In Rig (MMBIR or “mibber”).
Marty shared with the club a version of his power-less/dry break-in tool; it is stored in the white tool shelves. BENEFIT: you can face/contour your motor brushes to a more concave shape to have more contact with the commutator, and smooth the surfaces for less friction than box-stock (both increase the motors RPM). The plus of this rig is the motor being broke-in does not have any power applied to it and hence no chance of arcing (and less carbon deposits) as compared to a powered run-in. Hence – since the target motor is un-powered, you can more quickly ramp up the driving voltage (of the master/drive motor) and hence RPMs (meaning a faster contouring process).
PROCEDURE: Install an inline pinion (8z or 9z) on the motor to be broke-in (a press-on nylon Carrera 9t/z pinion can be used (if you plan to later install a sidewinder 11z or a 10z inline as a final setup). Snap a short-can into the open short-can pod; for long cans you need to add the bearing alignment crescent on the forward/end-bell end of the motor and add x2 M2 flat head mounting screws on the Can/shaft end, and attach the torque spring (these parts are in a RX bottle in the white boxes) Adjust the yellow crown against the pinion and tighten the crown’s M2 allen/grub screw.
NEVER remove the central Orange-Bell drive motor.
[The target motor(s) will turn the same CW or CCW direction as the Drive motor.]Locate a power-supply and ensure it is Off. Plug in to AC and connect the Positive from the power supply to the White gator from the MMBIR; negative to Green clip. Turn down the Voltage knob and turn on the power supply. Turn Up the Voltage until the Drive motor turns slowly (5 volts?) then ever so slightly increase the voltage 1/2 volt more to increase speed yet prevent overheating the Drive motor. Run at this level for 15 to 30 minutes or your preference. At this point the brushes and commutator have started “seating” against each other. Increase the voltage/speed (maybe up to 9 volts); then run in for a few hours; Keeping watch so that the drive motor does Not Heat Up and catch fire! I have a small blue table top fan at my Pit which you can aim at the MMBIR.
TACHING
Marty thoughtfully added disconnected long-can and short-can pods for Laser Taching. Mount the motor to be tached. Then press-on the Sensor disc from the blue tach pouch, (or a plastic 3/32 wheel with a piece of Reflective tape on it) to the motor shaft. Turn off the power supply. Connect the power leads (from the white pit boxes) – double checking the rotation you want (Slot.IT Short Cans – Clockwise at the end-bell for both Inline and left-side Sidewinder setups. NSR short cans – CCW (endbell end) for sidewinder and CW for inline. Long cans – CCW (can/pinion end) for anglewinder and CW for inline.) When Red/positive is attached to the Left side (facing the end bell) terminal, the motor will turn CW when facing the Pinion/Can end.
Find the Laser Tach and press Test to ensure the 9v battery is good (look for a light). Ramp up voltage of the P/S to 11v or 12v as per the series you are running the motor in. Aim the tach at the Sensor Disc/Wheel and push the Measure/Test button for 5 to 10 seconds. Stop the motor and then read the Tach Avg reading.

"... get on your bad motor scooter and ride!"
Sammy with MontroseJune 16, 2021 at 8:47 PM #16625Hmmm…can’t really tell from the pic how that is supposed to break-in brushes…where do they go?
--Stabn'Steer
June 17, 2021 at 1:49 PM #16626The best explanation is in Ary’s Motor Break-In How To Video
- As compared to 1/24 open-can motors, the commutator brushes on a FC130 short-can motor cannot be easily contoured/faced with a Hone and/or Turtle.
You would have to remove the wishbone from the plastic end-bell, contour/face,
then re-install – with each step Adding risk to damaging a fragile assembly. - So – using the MMBIR the comm. on the armature becomes your “hone”.
- “brushes” <> Pickup Braids in the context of the MMBIR
(altho it is common to call braids as “brushes” in the context of Carrera and other RTR 1/32 vendors)
"... get on your bad motor scooter and ride!"
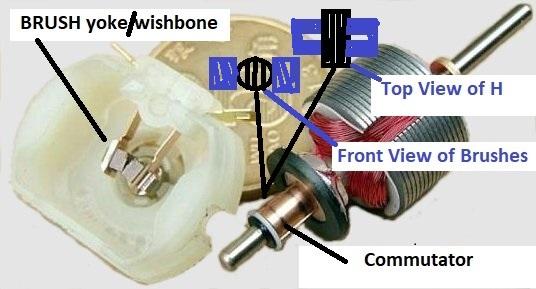
Sammy with MontroseJune 18, 2021 at 5:13 AM #16628WHAT THE COMMUTATOR BRUSHES LOOK LIKE
(I will soon show pics of the “H” configuration to clarify the benefit of Break-In/Burn-In)


"... get on your bad motor scooter and ride!"
Sammy with MontroseJuly 8, 2021 at 12:01 PM #16697See this video. At 5.38min it shows how commutators and brushes interact to make the rotating electromagnetic field that pulls/fights against the perm magnets in the Can. https://www.youtube.com/watch?v=CWulQ1ZSE3c&ab_channel=JaredOwen
"... get on your bad motor scooter and ride!"
Sammy with Montrose - As compared to 1/24 open-can motors, the commutator brushes on a FC130 short-can motor cannot be easily contoured/faced with a Hone and/or Turtle.
-
AuthorPosts
- You must be logged in to reply to this topic.
