Home › Forums › Club Races › Racing Calendar, Classes & Regulations › 2017 Goodwood Rules discussion
Tagged: GoodWood-Corvette
- This topic has 6 replies, 4 voices, and was last updated 8 years, 11 months ago by
 BarkingSpyder.
-
AuthorPosts
-
January 17, 2017 at 1:09 AM #10150
High points from Jan 14 club meeting, (ran by president Ary).
Goodwood rear-tire width depends on track. If your car has max track width of >= 55 to 60mm (such as with the Racer kit cars), maximum tire width is 9mm. Compatible tires are BRM 22 x 9mm, p/n# S-117. Wheels S-106-S (these are the 3/32 axles, the S-106 is for 2mm axles). If you have a Revel, Fly, Carerra etc. car with a max possible track of 55m, then 10mm width tires are allowed.
So, if tire width equals 55mm or larger, 9mm is max width. Otherwise 10mm is max.
Wheels: Front and rear wheels need a 15.8 nib minimum. Wheel width should not exceed tire width, (either 9 or 10mm max whatever fits the tires without any overhang).
Max Tire Track: 60mm. No visible overhang outside of fenders.
"... get on your bad motor scooter and ride!"
Sammy with MontroseJanuary 17, 2017 at 2:38 AM #10151Carerra Corvette Mods
I built a Carerra corvette this weekend. My experience/recommendations are: Make the mod as simple as possible; use the stock chassis. The HRS2 is too much of a hassle compared to the stock chassis.
25K motor – NSR Shark-25 recommended.
Keep the stock guide and wire – either snip off the connector and solder the guide wire to the motor (double check your polarity with gator clips before you solder!), or use the existing motor wire with connector (on the new motor).
Stock front tires and wheels – request rules exemption b/c the Carerra tires are 5mm? vs the spec of 8mm
Try the ‘Victor’ aluminum bushings with swiveling bushes. Axle is about 52mm. Green, Orange or Blue Crown (with a 8z or 9z pinion) gear.
To help Body Float – trim the edge of the chassis all the way around. Trim out chassis section immediately above/below the sprue for the rear bumper. Shoegoo bumpers as needed to keep them secure. Remove recesses from chassis ‘cups’ which mate with the body posts. Be careful since once the cups are gone there is only 0.5-1.0mm thickness left in the chassis screw recess.
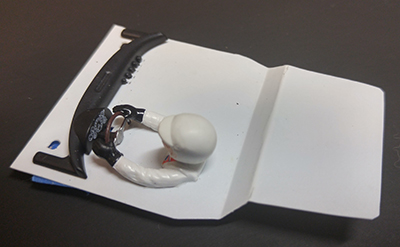
CockPit: Carefully remove drivers head. Find helmeted driver, enlarge hole in Carerra torso for the helmeted head, press in. Trim excess edge and Upper-ridges from cockpit platform. Use ShoeGoo to tack cockpit to body.
Rear Wheels /Tires: 15.8(nib) x 10mm wheels work great – look at Ninco and Slotting Plus for styled wheels not requiring inserts. Slot.It F30s or NSR SuperGrip 19x10s or 20x10s will fit.
"... get on your bad motor scooter and ride!"
Sammy with MontroseJanuary 17, 2017 at 8:59 AM #10160For those using a 3D printed chassis, here are some suggestions.
First of all, the printed chassis needed will depend on what car you have. For both the Fly Ferrari GTO and the Monogram Jaguar I used Shapeways/Olifer 3D printed chassis. Shapeways has a number of companies that they print chassis for, such as CG Slotcars and Slot.it 3D Print Shop. The Olifer chassis are the only ones I have. Here is a page of their products: https://www.shapeways.com/shops/3d_olifer?li=pb
Note that Olifer makes two different Ferrari GTO chassis, one which will accept either a sidewinder or inline motor pod and one which is listed as IL Pod. The inline pod chassis does not have the wider bump out at the rear and will require that bump out be cut off a Slot.it pod. The advantage is that the chassis is narrower, giving more room for tires and wheels. The regular chassis will require hubless wheels to fit under the GTO body. The Jaguar only comes with the narrow chassis. Olifer also makes printed inline pods that have already been narrowed. These motor pods have an adjustable rear axle height using the stock Slot.it spherical bushings. If the axle height is set to standard, inline with the motor shaft, regular crown gears will work. If the axle height is raised, offset crowns will be needed.
The front axle on the Olifer chassis will also use the Slot.it spherical bushings ( SICH56B, or robbed from another motor pod).
I like these adjustable axle setups.
For axles, any regular 3/32 axle will work. I am not sure of the length, maybe 48 or 51mm. I grabbed axles from my parts box. The ones I had were too long so I cut them.
For wheels and tires there are lots of options. One of the easiest, and the ones I used, were the Classic Wire Spoke Wheel and Tire sets from BRM, part number S106S. This includes 15 X 7 front wheels and 15 X 8 rear wheels with tires and the great looking wire wheel inserts. You can use these tires, after truing, or you could change the rear tires. Although it is not marked, I believe the rear tires in the set are 30 Shore. I used Slot.it tires on the rear, some F22s and some F15. BRM also has tires in those hardness. If you get BRM wheels make sure to get the wheels for 3/32 axles; they also make wheels for Ninco 2.5mm wheels.
For my original GTO with the GT40 chassis, there was not enough room for the hubbed BRM rear wheels, so I had to use CB Design hubless wheels. The only way to get the wire wheel inserts out of the BRM wheels was to carefully cut the BRM wheels. This also required shaving the inside of the CB Design wheels to get the insert to fit. With the narrow Olifer chassis, the BRM Wheels can be used as is.
You also have the option of using any other wheels and tires. You could use Slot,it wheels with whatever insert you wanted. The Slot.it Zero Grip front tires are pretty wide and may not fit. For my Jaguar, I created a rubber mold of the Monogram plastic wheels to create correct Jaguar cast resin inserts. These required some tweaking and I may not be able to create duplicates at reasonable cost.
You can use any inline motors that you want. I tried orange end bell, 25K motors and Flat-Six motors. They all worked reasonably well.
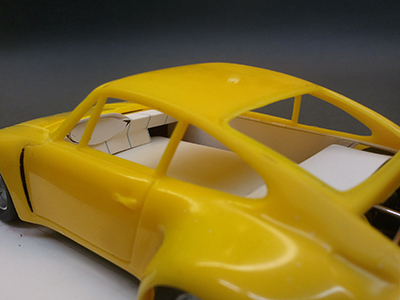
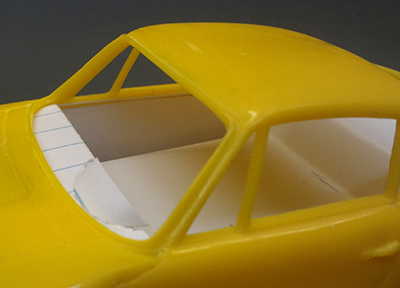
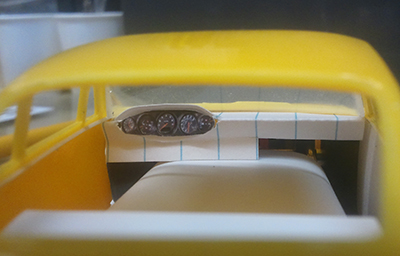
January 17, 2017 at 9:15 PM #10170The interior of the Carrera Corvette is flat plastic, but unnecessarily thick. I recommend .010″ white styrene sheet, which is what I used on the GTOs and Jaguar. First use some index card to get the necessary shape and then transfer it to the plastic. The Carrera dash can be cut level with the flat plastic. The seat tops, which are all that are visible in the Carrera, can be also cut flush and glued to the platform. I also recommend a double bend in the plastic which will add rigidity to the thin plastic. I don’t care much for typical lexan interiors as they just look like a blob (which can be improved with detail painting).
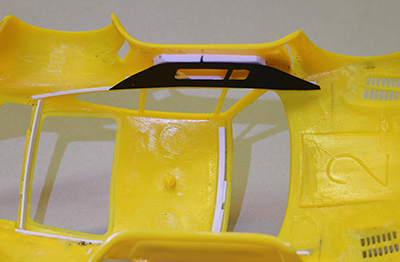
I also recommend retaining the original windshield as this is liable to get pressed upon during a race and should be rigid. Great care must be taken in cutting the windshield away from the rest of the “glass”. Using a razor saw, make sure to make very straight cuts without any side stresses. Clear plastic does not have the plasticizers that colored plastic does and is very brittle; it will crack. The side windows and rear window can be replaced with .010″ clear styrene. For the Porsche 935 I built from a wind-up toy, this is what I did. I used strip styrene superglued to the inside of the body to make a frame for the glass (make sure the super glue has dried before adding the clear, so it does not fog).
The Porsche had a complicated (and unfinished) interior with styrene interior door panels and a vacuum-formed hump in the middle that cleared the motor and chassis. I scratchbuilt the dash, mocking it up with index card first, then using a photo of the instrument panel.
January 22, 2017 at 12:50 PM #10173WOW
Russel this looks sooo cool
There is a lot of expertise and work implied here
Thanks a lot for sharing
January 24, 2017 at 12:10 PM #10192The following has been added / revised:
- Guide may not project beyond the body when aligned for straight, as viewed from directly above. Exception to the rule applies to the guide keel (only).
February 16, 2017 at 12:14 AM #10443@Carrera Corvette update – My car ‘porpoised’ out of the slot in tight turns, I assume due to the stiff stock centering spring. I loosened it by prying the center legs out but that did not seem to help. I replaced the stock guide with a tongue from the HRS-2 chassis kit; but it is appx 3mm too shallow and thus requires a guide with a long shaft (e.g. ScaleAuto) and a 3mm thick spacer (e.g. a Scalextric case screw washer).
The car is very rear heavy, so I added 14gm behind the front axle in order to reach a 40/60 F/R balance. The 25k Yellow bell seems needed because she’s a slightly chubby girl, but when goosed in the wrong spot the rear-end can swing or hop.
I used a Lexan driver/cockpit, for a Ferrari 512bb; I used the side-chad to cover the rear area. Its passable, but bug-fugly compared to Russel’s cabin/driver! Lexan packing end-pieces from Racer cars worked very well for windshield and rear window.
The hardest issue is the front wheels/tires – the best solution was an independent wheel set from a Carrera Cheeta, with zero-grips – producing an 18d X 10w final size. (loaned to Rich for a while).
Rich’s Stingray has the stock guide but does not porpoise like mine; but seems to have other handling issues.
This is one hard to handle American Woman!!
"... get on your bad motor scooter and ride!"
Sammy with Montrose -
AuthorPosts
- You must be logged in to reply to this topic.

